Thursday 18 February 2010

Baking # 1 - My Sister Reyes's Favourite Cake

I have recently begun a club at work called the "Hush hush cake club". There's 8 of us, 7 girls and a very brave guy who are determined to eat cake (or cupcakes, flapjacks, brownies, you get the idea) once a fortnight. All our names are on a rota, and every 2 weeks, someone has to cook and bring in cake for the rest of the club to enjoy mmm...! So, as it was my idea, tomorrow morning I'll be first to bring cake into work for the club. I had thought of making my speciality - Portuguese custard tarts - but was stuck in the office until well over 9pm so it was clear that there was only one cake I would (a) have ingredients at home for and (b) be able to bake in a jiffy: my sister Reyes's favourite cake!


Ingredients:
* 2 cups self-raising flour
* 1 cup sugar (I usually use only 3/4 cup because otherwise I find it a bit too sweet)
* 1/4 cup oil
* 1 cup milk
* 2 eggs
* 1 tsp cinnamon / 1 tsp mixed spice / 1 tsp vanilla extract (whichever you prefer - isn't it brilliantly versatile?!)


First, preheat oven to 180, and sift dry ingredients together in a mixing bowl. Mix with a wooden spoon and create a well in the centre. I used mixed spice for this cake.

Then mix wet ingredients and slowly start combining them both together until you have a slightly runny mixture.


Transfer mixture in cake tin (I used a disposable paper one because it's easier to transport into work tomorrow) and then place in middle shelf in oven and bake for approx. 50 minutes without the fan, 40 min with fan, or until a skewer comes out clean.

My house now smells of spices... and there's cake... and I'm hungry... and, let's face it, I KNEW it wouldn't last intact until tomorrow morning!

Wednesday 10 February 2010

Craft Projects: Lavender Bags

Last week I purchased two luxury duck feather cushions for my sofa (the project is to make beautiful cushion covers once I have a sewing machine) through the Niki Jones website. When the order arrived at work, inside was a catalogue of Niki's collection for this season. There's loads of gorgeous things, and among them was a set of 2 lavender bags. Following the motto of my family of "why pay for something I can make myself?", I decided just that. I bought aromatic dried lavender online (£8.99 half a kilo at Daisy Gifts, bargain - particularly if we compare it to the £16 a pair at Niki Jones) and I had an excuse to go to Liberty to buy the material (soft, very fine cotton tana).

I have already lost count as to how many lavender bags I've made so far, but it's fun and a bag can be made in less than an hour. Plus, they're useful! So my instructions to make lavender bags are as follows:
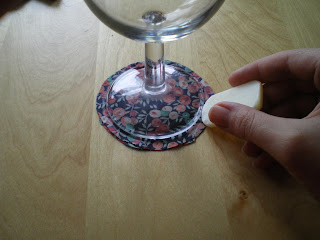
When undertaking any craft that involves circles, I love to trace the shape from every-day objects around the flat. In this case, an empty Gu bowl. So, on the "back" side of the material (If anyone reading this - perhaps Rocio? - knows the proper name for this, please let me know!) trace out two circles with a soap bar and cut out.
Put both circles on top of each other, with the "front" sides (or pretty sides, where the print is nicely seen - again, there should be a word for this but...) on the inside and trace around one of them a smaller circle with soap.
Pin two sides together and cut a long strip of thick ribbon-like thread (mine was around 13cm) and place it between both sides, with just the end tips sticking out.
Proceed to sew around the material, following the last circle drawn on one of the sides, until there is about 2cm to complete the circle.


Turn bag inside-out and with a small fennel (I made mine with cardboard), fill in bag with lavender until it is almost full.

Fold the 2cm gap in the bag inside, sew the sides together and presto! You have a lovely lavender bag. I have also made bags without the handle so as to put them in drawers.

Monday 8 February 2010

British Cuisine # 1 - Fish Pie

Last year for my birthday, I was given a beautiful Richard Bramble oven dish with a brilliant fish on it, but it wasn't until the weekend that I realised I had never used it to cook fish. I therefore decided this had to change and went to Sainsbury's to buy all the necessary ingredients to make one of my favourite British dishes: fish pie. The recipe below feeds around 6 people.


Ingredients:
* 25gr butter
* 2 onions finely chopped
* 250ml dry white wine
* 500ml fish stock
* 500ml double cream
* Salt and pepper
* 800 mixed white fish fillets (cod, haddock or, my favourite, monkfish)
* 200gr raw peeled king prawns
* 1 lemon
For the topping you'll need:
* 4 large potatoes (I only used 3 and so could've done with an extra one)
* milk and butter for mashing
* 2 egg yolks

First of all, heat the butter in pan and add the onion and stirr it around under medium heat until soft and a bit brown.


Add the wine and cook until it has reduced by half. Then, add the fish stock and let it bubble away until it has reduced by half again.


Add the cream and let it boil until it has thickened to a sauce. I was so impatient that I didn't, which made my sauce (a) runny and (b) not as tasty as it should have been if I had left it on the pan for longer. As the sauce is really the star of the dish, ideally you'd let it simmer slowly so all the flavour comes out nicely (and if it doesn't thicken, just add a bit of cornflower ;-). Right, once it has a sauce-like consistency, strain through a sieve, discarding the onion, season with salt and pepper and leave to cool.


Meanwhile, preheat the oven to 180 degrees, check the fish for any bones and cut in 3cm chunks. Poach the fish in enough water to cover with a squeeze of lemon juice, and when slightly undercooked, remove fish with a slotted spoon. While fish is being poached, peel, chop and start to boil potatoes (I normally cut potatoes into small cubes so they get soft faster).


Gently fold the prawns and fish into sauce with another squirt of lemon juice. Then, transfer all to an oven dish. When potatoes are ready, mash with butter and milk until smooth. Beat in the egg yolks and spoon over the filling.


Transfer dish to oven and bake for about 20 minutes, until bubbling and golden brown on top.
Enjoy!
The original recipe which inspired this one is a Gordon Ramsay and can be found here.

Friday 5 February 2010

Crochet Anonymous

Hello, I'm Araceli and I'm addicted to crochet.

There, I've said it. Simple, and to the point. One thing about crochet is that no one tells you how addictive it is, or how, suddenly, your right hand index finger swells up and looks like the Hulk's index.

I learnt how to do crochet years ago, my mother taught me, but there was no scope to make interesting stuff, just useless round basket-like woolly things - my crochet abilities were very limited. So it wasn't until I went to Birmingham to a friend's house last September that the crochet beast inside me was awakened. My friend taught me how to make these awesome twirly scarves. I didn't buy the yarn and crochet hooks until December, but so far I have completed two of them! (the purple one was completed only last night, and it's owner and I proudly stood for the photo below with our awesome scarves)


The trick is to make a very long chain, then do simple crochet over it and when you complete the line, repeat the simple crochet, but this time making one chain between the crochet stitches, that's how you get the twirl. The rest is easy, just double crochet lines until you reach the thickness you want. The purple scarf took up to 6 yarns, and the green around 5.

Monday 1 February 2010

Asian Cuisine # 1 - Pad Thai

I'd like to be able to say that the first time I ever had pad thai noodles was somewhere in Ko Samui as Delia Smith, whose recipe inspired mine... but I didn't. It was actually at this brilliant place in Amsterdam called Wok to Walk.


Anyhow, this weekend I attempted to re-create the deliciousness of that dish in my flat. Twice. First time around, when I took the pictures below, I realised I was paying far more attention to my photographs than the dish itself, so it was slightly burnt and dull dull dull. However, the second time around, it was simply amazing. Here's what you have to do to make a good pad thai to feed two hungry people:

Ingredients:
* 110gr rice noodles
* 1 large chicken breast or same flesh quantity thigh and leg (I prefer thigh and leg meat as it's juicer and tastier - chicken breast reminds me of the long diets I used to struggle to follow)
* 175gr fresh/uncooked headless tiger prawns
* 3 tablespoons groundnut / other flavourless oil
* 2-3 cloves of garlic, peeled and crushed
* 2 medium red chillies, de-seeded and finely chopped (beware of the killer chili, and the sting it can leave on your hands - next time I cut these b*stards, I'll be wearing rubber gloves)
* 1/2 medium red onion, thinly sliced into half moon shapes
* 2 tablespoons Thai fish sauce
* juice of 1 large lime (my second pad thai had more lime juice than fish sauce and it gave it a wonderful limey flavour)
* 2 large eggs, lightly beaten
For the garnish, you'll need:
* 50 gr crushed unsalted natural roasted peanuts
* 2 spring onions, finely chopped including green parts


It is of vital importance that when you are ready to make the pad thai (cooking time is no longer than 3 or 4 minutes) that all the ingredients are ready to be used and at hand.

The very first thing that I did was prepare the peanuts - it's very relaxing (I'm lying, it's a pain in the arse). Then, cut the chicken into nice pieces that you'd be happy to put in your mouth and fry it. Once it's cooked, remove from pan and leave in a bowl together with the rest of the ingredients - I even put them all in a cooking queue, so as to not lose concentration when adding it all to the very hot wok. Next, place noodles in a bowl and cover with boiling water for about 15 minutes. After this, drain in a colander and put them back in bowl.

To prepare the prawns, peel (if you are not as lazy as I am as I purchased peeled prawns), devein (or as we say in Spanish, remove "la caca") and cut in 2/3 (depending on size of prawn).


Now you are ready for the REAL cooking of the dish, and with your array of ingredients ready and in line, begin by adding the oil to the wok and put it over a high heat until it is really hot. Then, first add the garlic, chili and red onion and fry until onion is tender.


Then, keeping the heat of wok still high, add prawns and chicken and cook until prawns are pink.


After that, add fish sauce and lime juice, stir for a couple of seconds and then add the noodles. Toss them around until they are heated (this takes around one minute).


Next add the beated egg by pouring it slowly and evenly all over. Let it begin to set and when you see your amazing pad thai has the audacity to try to turn into an omelet, stir it vigorously around until the egg is cooked in little shreds.


Then mix in half the garnish and give a final stir, before you serve immediately in bowls with the rest of the garnish sprinkled over each bowl.