Tuesday 4 May 2010

Leighton House Museum

On Monday my long-dormant Stendhal syndrome made itself present when I visited the Leighton House Museum. (picture is taken from the street as the gits don't let you take any photographs inside, and I apologise for the quality of some of the photographs, the best I could find on the internet but still...)


In what appears to be a rather plain facade in Holland Park, lived and worked the brilliant Frederick, Lord Leighton. My curiosity about this artist came about when I first saw an image of Flaming June - not the original as it's in a museum in Puerto Rico, or was it Costa Rica? Anyway, it is a beautiful painting nevertheless.

Back to Lord Leighton, he was also a sculptor, became President of the Royal Academy of Arts in1878 and is the only British artist to have been ennobled - he is buried in St Paul's Cathedral.

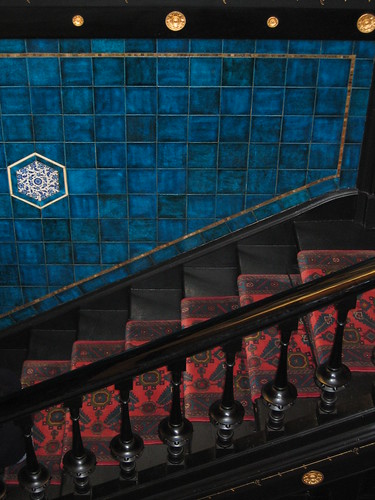
His house in Holland Park is true to the Aesthetic Movement Lord Leighton has often been associated with: gilded ceilings and walls lined with peacock blue tiles, as well as rich and colourful silks, with countless paintings and drawings.


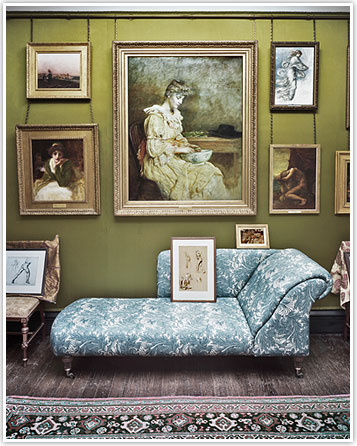
In his dining room Lord Leighton was host to some of the greatest names of the Victorian era: Robert Browning (for whom he designed his memorial), Dante Gabriel Rossetti, William Morris and even Queen Victoria herself!


The centrepiece of the house is the Arab Hall, decorated with over a thousand tiles he purchased in Syria which date back to the 17th century.


Above the Arab Hall, on the first floor, is a Mashrabiya, an Egyptian latticework window, that overlooks the Hall.


The studio has changed somewhat...


Leighton House is open daily from 10am to 5.30pm, although it is closed on Tuesdays.

Sunday 18 April 2010

Archway Market

Now that I have come to grips with my crochet addiction, I decided to actually make a profit out of it... How? By selling my stuff at Archway Market!


Less than 2 weeks ago I brought into work the crochet hair clips, bobbles, etc. I had made as presents for my nieces. Amazed - in an almost Stendhal syndrome kind of way, no kidding - my colleagues asked me if I had considered selling my creations. We considered the possibility of selling them to shops but quickly decided they'd pay me peanuts so the idea of having my own stand at a market seemed like the best idea. Archway Market is a very new market in North London selling great organic products, but also furniture, books, and now... handmade-with-love (and lots of it) crafts! After sending through my application and being accepted, I got to work and spent days crocheting like mad. I also asked my lovely and talented sisters Reyes and Rocio to send me the stuff that they make so I'd sell it in the stall as well - Reyes makes absolutely beautiful jewellery and Rocio is a seamstress goddess, and her waterproof washbags are brilliantly versatile. Then, a friend from work was so excited about the stand that she made gorgeous cards, purses and brooches (it can also be spelt broaches, we checked) and helped me on the day! The final product is a lovely stall called "Mamás & Bebés" which will be at Archway Market every 2 Saturdays (next one is 1st May) from10am until 5pm.


Saturday 20 March 2010

Playing with food

Finally a post which isn't about cooking! Just about food...

In early January, just as my addiction to crochet was begining to develop, I decided to buy my first ever crochet book: Tasty Crochet. It's a truly excellent book, with the easiest instructions to follow and the final product just couldn't be any more awesome. It's one of my neice's birthday's next week - she's turning 4 - and I thought it would be a cool present to send her some play food for her pretend picnics.


Ice-cream sandwich mmm! And the piece of cake is an exact replica of the one my mother makes, with pastry and a delicious yolk and sugar topping with strawberries and kiwis.

I never in my life thought I'd make a crochet burger... and chips!


Or a drumstick?! The book is just priceless!


Mmmm fried up breakfast! I literally just had a real version of the below, minus the bagel.


Sunday 14 March 2010

American cuisine # 1 - Nick's Chili con Carne

When I first moved to London in August 2007, I shared a flat with 3 other people and we all ate chili con carne that winter almost every night. Yes, every night. Nick, the then head chef of the house (not only did he cook, but he also did the dishes after, how cool is that?) first made this recipe about a week after he'd moved in September that year. I remember it quite clearly as our dumb-ass landlord had somehow managed to kick us all out of the house for the day so he and a buddy played some sort of geeky boardgame whose name escapes me now... TALISMAN!! Got it, phew!


Anyway, after much begging (2 seconds), Nick agreed to share with me the recipe of the dish that kept us going that winter, so below are clear instructions on how to make a good chili con carne for 4 hungry people:


Ingredients:
* 5 cloves of crushed garlic
* 1 inch cube of ginger thinly cut
* 4 tbs olive oil
* 500gr mince meat
* 1 red pepper sliced
* 1 tin chopped tomatoes
* 1 tin red kidney beans
* 1 tsp ground paprika
* 1 tsp chili powder
* salt and pepper

I usually eat the chili with basmati rice, greek yoghurt and grated cheddar cheese - mmm!


First, heat the oil in pan with a good grind of black pepper (like 5 peppercorns more or less) and while it's warming up, finely cut the ginger and press the garlic.


Add garlic and ginger but be careful as to not burn them! Stir and immediately after add the mince, mixing it all together.


When the mince is nice and brown and cooked through, add the chili powder and paprika.


Slowly add the chopped tomatoes...


... and then add the drained and washed kidney beans.


Bring the temperature of pan to the max heat and add the chopped pepper.


Then add a mug (approx 300ml) of boiling water, add about a tsp of salt and another good grind of black pepper, mix it all together, cover almost completely and let it simmer for at least 45 minutes.


Proof that it's a delicious recipe are the pictures I took during today's lunch and within 5 minutes of each other - YUMM!!

Monday 1 March 2010

Baking # 2 - Chocolate Peanut Cookies


Oh yeah, even the title of this post sounds awesome, not to mention the cookies themselves. Friggin' fantastic. AND it was my recipe entirely, I feel so proud, so so proud. Last weekend I was stuck at home with a cold and there were no interesting sports going on in the Vancouver Olympics to watch. And I wanted cookies... so I rummaged through my cupboard and found the following ingredients to make 25 chocolate peanut cookies:


Ingredients:
* 1 cup soft brown sugar
* 1 cup flour
* 1/2 tsp baking powder
* 1 cup hot chocolate mix
* 125 gr unsalted butter melted
* 1 egg
* 1/2 cup chopped peanuts

First of all, preheat oven to 190 degrees Celsius and mix wet ingredients with a wooden spoon.

Then mix flour, baking powder and chocolate mix (I used Montezuma's drinking chocolate mix number 1 but I think - must test this to prove this - if you used small chocolate chips it wouldn't make too much of a difference).


Mix all ingredients together, including the chopped peanuts (oh yeah, I peeled and crushed them again as I still had a lot left after I made my pad thai - a pain); the batter will be a bit difficult to work with.


On a flat oven dish, place tablespoonful amounts of the cookie mix with approx 3cm separation between them, and flatten them out.


Bake for 8 minutes - no more or they go hard very quickly (unless you like hard cookies) and they're done! Mmmmm...!

Thursday 18 February 2010

Baking # 1 - My Sister Reyes's Favourite Cake

I have recently begun a club at work called the "Hush hush cake club". There's 8 of us, 7 girls and a very brave guy who are determined to eat cake (or cupcakes, flapjacks, brownies, you get the idea) once a fortnight. All our names are on a rota, and every 2 weeks, someone has to cook and bring in cake for the rest of the club to enjoy mmm...! So, as it was my idea, tomorrow morning I'll be first to bring cake into work for the club. I had thought of making my speciality - Portuguese custard tarts - but was stuck in the office until well over 9pm so it was clear that there was only one cake I would (a) have ingredients at home for and (b) be able to bake in a jiffy: my sister Reyes's favourite cake!


Ingredients:
* 2 cups self-raising flour
* 1 cup sugar (I usually use only 3/4 cup because otherwise I find it a bit too sweet)
* 1/4 cup oil
* 1 cup milk
* 2 eggs
* 1 tsp cinnamon / 1 tsp mixed spice / 1 tsp vanilla extract (whichever you prefer - isn't it brilliantly versatile?!)


First, preheat oven to 180, and sift dry ingredients together in a mixing bowl. Mix with a wooden spoon and create a well in the centre. I used mixed spice for this cake.

Then mix wet ingredients and slowly start combining them both together until you have a slightly runny mixture.


Transfer mixture in cake tin (I used a disposable paper one because it's easier to transport into work tomorrow) and then place in middle shelf in oven and bake for approx. 50 minutes without the fan, 40 min with fan, or until a skewer comes out clean.

My house now smells of spices... and there's cake... and I'm hungry... and, let's face it, I KNEW it wouldn't last intact until tomorrow morning!

Wednesday 10 February 2010

Craft Projects: Lavender Bags

Last week I purchased two luxury duck feather cushions for my sofa (the project is to make beautiful cushion covers once I have a sewing machine) through the Niki Jones website. When the order arrived at work, inside was a catalogue of Niki's collection for this season. There's loads of gorgeous things, and among them was a set of 2 lavender bags. Following the motto of my family of "why pay for something I can make myself?", I decided just that. I bought aromatic dried lavender online (£8.99 half a kilo at Daisy Gifts, bargain - particularly if we compare it to the £16 a pair at Niki Jones) and I had an excuse to go to Liberty to buy the material (soft, very fine cotton tana).

I have already lost count as to how many lavender bags I've made so far, but it's fun and a bag can be made in less than an hour. Plus, they're useful! So my instructions to make lavender bags are as follows:
When undertaking any craft that involves circles, I love to trace the shape from every-day objects around the flat. In this case, an empty Gu bowl. So, on the "back" side of the material (If anyone reading this - perhaps Rocio? - knows the proper name for this, please let me know!) trace out two circles with a soap bar and cut out.
Put both circles on top of each other, with the "front" sides (or pretty sides, where the print is nicely seen - again, there should be a word for this but...) on the inside and trace around one of them a smaller circle with soap.
Pin two sides together and cut a long strip of thick ribbon-like thread (mine was around 13cm) and place it between both sides, with just the end tips sticking out.
Proceed to sew around the material, following the last circle drawn on one of the sides, until there is about 2cm to complete the circle.


Turn bag inside-out and with a small fennel (I made mine with cardboard), fill in bag with lavender until it is almost full.

Fold the 2cm gap in the bag inside, sew the sides together and presto! You have a lovely lavender bag. I have also made bags without the handle so as to put them in drawers.